Sunday, November 18, 2012

Apples

Growing up in Upstate New York was a treat. I loved the four distinct seasons, which is something I miss very much  living in Israel ( hot pretty much all year round). Each season had its special charm; that something that makes you remember it with a smile. 

Summer was boating time for us and I loved every minute of it.

Winter was snow, snow, snow and with it came skiing on weekends. In those days ( when life was simpler and safer!) my parents used to put us on the bus early Saturday morning for one of the local ski resorts, loaded with our ski equipment and enough money for lunch and a hot chocolate. My brother and I had to be all of maybe 9 or 10 years old.

Spring was , well, springtime.... finally relief from the cold, hard ( but fun) winter .

And then there was fall. I love the autumn with the changing colors of the trees, raking up the falling leaves and that slight chill in the air.
One of my favorite memories is that of going apple-picking; driving out to the countryside to one of the local apple orchards. You paid for what you picked , which wasn't that much for a little kid. The "store" was a roadside stand where they also sold fresh apple cider , pies and other apple products.

With this memory in mind, I decided to choose them as the basis for my "series" photo shoot in the photography course. Here are the results.
apples,
 apples and ......

more apples


apple cider caramels from Smitten Kitchen


crunchy caramel apple pie


Today was the last session of the course and I can say that I enjoyed every minute- even with the frustrating moments I had.
I look forward to continuing to "play" with my camera and improving my skills. I've learned so much yet have so much more to learn. Thanks to Danya and Deanna for the wonderful learning experience, the non-ending support and the chance to get to know such talented and creative women. You're the best!

Monday, November 5, 2012

Food Styling and Photography Course

I am not as consistent with this blog as I would like to be. I'm a professional procrastinator. From time to time I get on a roll and write every few weeks or even once a week, but those instances are few and far between.
One thing that bothers me is the quality of the pictures I take, so I decided to take a photography class. Originally I was looking at general photography classes, but then came across this amazing blog and noticed that the two very talented writers of the blog, Deanna and Danya, were offering a course in food styling and photography. Just what I was looking for!

We are into our  4th session (of 6) now. I have learned so much in such a short time- mainly, how much more I have to learn and practice!  I am amazed at how much time, adjusting and readjusting, it takes to achieve the final shot.

Our first assignment was to copy a photograph of our choice. I knew my first choice would be something from the incredible Tartlette. ( I just ordered her book Plate to Pixel, and am anxiously awaiting its arrival!)
Since cookies are one of the things I make the most, I decided to look for a photo that was do-able for me, both from the standpoint of the cookies themselves and the photo. I wanted to start out with something that ( at least on first glance) seemed like something I could recreate. Below, left, is the photo I chose- the original from Tartlette and on the right, my recreated version. I used a different recipe than the one Tartlette posted and my cookies came out much darker than hers.


my version


Cocoa Nib Chocolate Shortbread Cookies
Original picture by Tartlette


 The second assignment was , believe it or not- cookies! This time I decided to try and photograph some of my decorated cookies, since that is something I do a lot of on the blog. It's quite a different type of medium than what the rest of the girls in the course did, but I went with it anyways. Here is the result. The baby cookies are in honor of the birth of my second grandchild- a boy, who joined us this past week. How exciting!


 Our next assignment is to create a photo of something that reminds us of fall- of course having to do with food. I have a few ideas in mind. We'll see the results next week.

Sunday, November 4, 2012

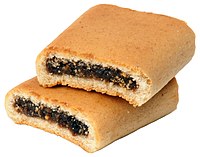
Homemade Fig Newtons

fresh figs


dried figs


Fig season is here in Israel and I must say that I had never tasted a  fresh fig until recently. They always looked so unappealing to me and though I'm usually open to tasting anything, these just didn't appeal to me.
How wrong I was!!I finally tasted one about two years ago, straight from the tree where they were being picked from. It was like drowning is a sweet, silky bath of deliciousness! How wonderful a taste- now I can't wait for the season to begin each year. I've always liked dried figs, but I must say, there is absolutely no connection ( in my taste buds opinion) between fresh and dried. I like those and I like those. Two different things!
Fig Newtons are one of those childhood memories that one never loses. The texture, the taste, that little crunch of the fig seeds, all melting in your mouth at once. I've always wanted to try a homemade version and finally got around to it yesterday. YUM!! They turned out amazing! Just the taste I remember( and I haven't had a Fig Newton in.... well lots and lots of years).
I actually took two recipes and adapted them to my own. I also did one other thing that was a major accomplishment for me. My daughter does not eat eggs( as of late) and I decided to make the dough using a substitute for eggs.  To my amazement, the dough was easy to work with, rolled out beautifully and baked up just perfect. Certainly can't tell any difference in taste- a success!

The Original Fig Newton

before baking
before


homemade fig newton


  Homemade Fig Newtons(adapted from various sources)
For the dough:

8 oz.( 280 g.) all purpose flour
4 oz. unsalted butter , room temperature( I used margarine - no dairy!)
1/2 cup sugar
1 oz. honey
1/4 tsp. salt
1/4 tsp. baking soda
2 tsps. vanilla
1/8 tsp. cinnamon
1 tsp. orange zest
1 oz. orange juice
3 egg yolks( for each egg, combine 1 tbsp. apple vinegar and 1 tbsp. baking soda- mix together and add when you would the eggs- I reduced it to just one actually and it came out fine)

For the filling:
1 cup or so of finely chopped dried figs( they say Black Mission is the best- I bought them at an open market so I really don't know what kind they were but the filling was delicious!)
3 tbsp. unsweetened apple sauce
1/2 tsp. orange zest
1 1/2 oz. honey
1/4 tsp. cinnamon
1/2 cup or more of orange juice, as needed


Filling:
Combine the all the ingredients for the filling in a medium saucepan and bring to a boil. Cook on very low heat until soft and jam-like- mine took about 1/2 hour. Set aside.

Dough:
Sift the flour and baking soda together and set aside.

Cream the butter or margarine together with the sugar, honey, vanilla, cinnamon and orange zest until creamy. Scrape the bowl with a spatula and continue mixing. Add egg yolks ( or substitute) one at a time and mix until thoroughly combined.

On low speed, add the sifted flour mix all at once and mix just until incorporated then slowly pour in the orange juice. Continue mixing just until it comes together. The dough will be somewhat wet and soft. Transfer the dough to a large sheet of plastic wrap and flatten into a disc. Wrap tightly and refrigerate for at least 4 hours or overnight.

 Make the cookies:
Even after chilling, the dough will be softer than usual. Dust your rolling surface and the dough, generously with flour and roll out to a rectangle approx. 12x14 and 1/2 in. thickness. Divide into 4 equal strips. Spread the filling along the center of each strip. Fold the dough over and pinch edges. Place seam side down on parchment lined baking sheets  and slice each log on the diagonal into about 10 cookies.

Bake for 12-15 minutes or until golden brown. Cool on a rack.

These cookies get even better over the next day or two. Store in an air-tight container.