Wednesday, July 22, 2009

All Done!

Our group
That's it! I finished the pastry chef course ( I even passed the test I was dreading!) and what an ending it was. We spent the last two lessons preparing for the "finale" - an evening with our invited guests tasting our goods.
The evening was a true success - food, atmosphere and a major cooperative work effort on the part of all the class participants. We worked sooooo hard- I am now convinced that working in a pastry shop, being on your feet for amazingly long hours, is not for me. When I finally got home after midnight, I could barely walk and I was out of commission for most of the following day! I'll stick with the small time home-based business for now.
The evening began with roaming waiters ( us!) serving small cups of cold basil zucchini soup with cheese sticks. It was a very hot night and the event was outdoors so the cold soup was a welcome. A buffet table was then manned by more waiters (us again!) serving salads, a variety of breads, quiches and savory bites ( all prepared by us , of course!)

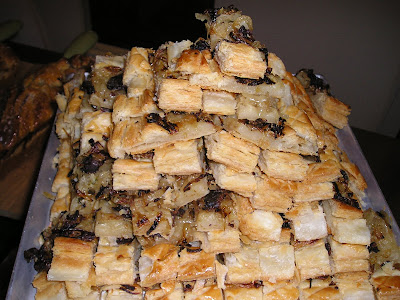
pissaladiere (puff pastry with carmelized onions, anchovies and black olives

Then came the "piece de resistance"- dessert. What a selection there was. Chocolate-nougat mousse, toffee- nut tarts, chocolate-pear tarts, dulche de leche mousse, cheesecake mousse with a cinnamon crumble ( yum!) coffee-pecan cookies, basil-almond lemon cookies ( very interesting), vanilla creme cookies, vanilla-chocolate- coffee cookies, citrus cake, chocolate-poppy seed cake, white chocolate penacotta with passion fruit and a streusel topping, meringue cups with a lemon-mint ganache filling...... should I go on?!

mini chocolate fondant cake and in the background,toffee-nut tart


Krantz Cakes- (plaited yeast cakes with a chocolate/halva filling)
I managed to get a only few pictures in between the serving and preparing and washing up. Feast your eyes!


basil-almond lemon cookies
All in all, it was a wonderful learning experience and I made some great friends along the way! Onward to the advanced course!

Friday, July 17, 2009

Business Card

Posted by Picasa Here's the card I forgot to put on the previous post!

Cookies for Sale!

Some examples of my latest work and the business card I had made.


Posted by Picasa

Sunday, July 5, 2009

Tahini Cookies

It's hot outside and I don't do well in the heat. Then why am I living in such a hot climate, you may ask? Good question and a long story ( but that's for another time)- but I can tell you that this global warming thing is real- summers are definitely much hotter than they used to be. Either that or my memory is starting to fade.
Air conditioning- I couldn't survive without it, spoiled thing that I am. So when it's unbearably hot and sticky outside, inside is where you'll find me- ironically enough- baking! Yeah, I know; the heat of the oven , etc. etc. Doesn't matter. As long as I'm working in the A/C, I 'm fine. So my project for today was tahini cookies . I am testing out all kinds of cookies recipes as I'm hoping to get my stuff together and start selling a bit when the school year starts again. Business cards are in the working and I'm am busy getting a solid list of tried and true recipes together. At least I'm trying to be organized- that's a step in the right direction!
These cookies are easy, easy, easy , delicious and melt-in-your mouth. If you've never tried anything with tahini paste before, then I highly recommend giving it a chance. Beyond the typical tehina sauce, it can be used in baking with super results.


Tahini Cookies (adapted from "Cookies" by Benny Saida) 50 cookies
Ingredients:
3 cups ( 420 g.) flour, sifted
1 tblsp. baking powder ( 10 grams )
1 cup ( 200 g) sugar
1 cup tahini paste
1 cup ( 200 g.) butter, softened
50 almond halves for decoration
1. Preheat oven to 350 F. ( 180 C)
2. Place all ingredients in bowl of mixer and blend until a uniform dough is formed.
3. Form 50 balls of dough ( I weighed each one at about 20 g. so they would be uniform) and place on a parchment or silicone lined bakin sheet.
4. Lightly flatten each ball and push in an almond half on top.
5. Bake 15-20 minutes until just beginning to turn golden. Cool thoroughly on wire rack and store in an airtight container.


Thursday, July 2, 2009

Chocolate Week

Had some trouble posting this but I think it's all straightened out now. Anyways, as I was trying to say before, the pastry chef course I have been taking is coming down to the finish line. Next Monday we have our final test( gulp!). This past week was the first of two lesson about chocolate. We learned about the origins of chocolate, how it is made, what makes a fine chocolate and how to work with it in baking. Next week comes the candy part. The 4 recipes we made were all quite simple, but very rich and delicious, as well as impressive on the plate. (Not to mention impressive on the waistline!)


Coconut Chocolate-Orange Treat
three layers of a coconut macaroon type with chocolate-orange ganache in between-
total decadence!


Three Chocolate Cookies-
a chocolate cookie with bitter, milk and white chocolate chip pieces
(at home I exchanged the white chocolate chips for peanut butter chips- both were amazing!)


Cremeux chocolate tart-
a delicious base with chocolate, carmelized nuts, butter and a bit of flour (wow!),
a crispy middle and cremeux in between! Hard to describe the incredible flavor.


Coffee-Chocolate Brownies with a cheese and white chocolate topping- just the best!

Recipe for these brownies ( which can also be marbelized instead of having the cheese on top)
For a small square pan( I used an aluminum 25cm x 18 cm)

Brownie mix:

80 g. dark chocolate
80 g. butter
1 tsp. instant coffee diluted in 1 Tblsp. hot water
100 g. brown sugar
60 g. white sugar
2 eggs
60 g. white flour
pinch of salt
20 g. chopped walnuts

Heat oven to 170 C (325 F)
Butter the pan well.
Melt the chocolate, butter and coffee in a double boiler ( bain marie) . Mix until smooth. In a separate bowl, mix eggs and sugar well and then add to the chocolate mix which has been removed from the heat source. Continue to mix until smooth. Add the flour, walnuts and salt and lightly mix.
Pour into pan and bake 17 minutes.

In the meantime prepare the cheese topping:
30 ml. heavy cream
75 g. white chocolate
100 grams cream cheese (here in Israel I use a soft white cheese that is 9% fat) If you use Philadelphia, be sure it is softened to room temperature.
25 g/ sugar
1 egg
20 g. flour
1/2 tsp. vanilla extract

Melt the heavy cream and white chocolate in a double boiler. In a separate bowl mix the cheese, sugar , egg and vanilla. Mix in the chocolate mix. Add the flour and mix well until smooth with no lumps.
As soon as the brownies are finished baking for 17 minutes, take them out and carefully pour the cheese mix on top ( start from the sides and let in fill in towards the middle) and return to the oven for another 15 minutes to set. The top should not brown. Cool completely and cut in to small squares (they are very rich!) I dusted some with cocoa and some with confectioner's sugar and set them on a plate in a checkerboard fashion. Use your imagination!