Saturday, October 31, 2009

Chocolate Hazelnut Sandwich Cookies


I have a "to do" list - meaning things I want to cook or bake- a mile long and in a million different places. I decided it was time to get myself organized and try to tackle the mission. First, I went through all the recipes I 've saved from the web. Deleted what may have looked interesting at the moment but on second thought , didn't really appeal to me. Then I organized what was left, into categories (this organization is too much for me!). Okay, one area taken care of. Next, I went to the notebook I keep with all the printed out recipes I have collected overtime- from friends, magazines, newspapers and the web.Threw out what again, sounded fantastic when I took them, but on reconsideration, realized it was something I either wouldn't probably like, was too complicated or had ingredients I couldn't get here in Israel. That was a nice sized pile in itself. I get carried away sometimes!

So now, I have a still long "to do" list, but it seems a bit more approachable. Now comes the committment part. I am making a pact with myself ( can you do that?) that I will tackle at least one recipe a week from the "to do" list. Hopefully post about it too- now that's another story alltogether.

This recipe has been on my "to do" list for ages. No particular reason I'm starting my quest to go through the list with this one, just had a chocolate thing at the moment and these looked irresistable.
I found it in Hebrew on a local food site. The picture of the cookies was so enticing, not to mention the sound of the ingredients. What could be bad about chocolate and hazelnut?
I made the cookies as per the recipe but I think next time I would make some changes, even though the end result was absolutely amazing. All who tasted said they were heavenly.
My main problem was that the dough was very soft to work with, even after being in the refrigerator all night long. I found I had to re-refrigerate it afer each rolling because it just got too soft to work with. I definitely suggest trying these cookies - I will write my suggestions for changes in parentheses. If anyone out there comes up with other alterations, feel free to comment.

Chocolate Hazelnut Sandwich Cookies (original recipe said it makes 30 cookies- I got about half that !)

80 grams butter, cut into small cubes , slightly softened
1 teaspoon vanilla extract
1/4 cup  (55 grams) sugar ( it called for fine sugar- I used regular cause that's all I had- might try powdered sugar next time)
1 egg
1/2 cup (50 grams) hazelnuts, ground fine ( I grind them in a small coffee/spice grinder and add a small amount of flour to prevent it from turning into a paste)
3/4 cup (110 grams) flour (I think I would add a bit more next time,maybe it will make the dough a little less soft)
1/4cup (25 grams) cocoa powder

Filling:
100 grams bittersweet chocolate,melted
50 grams butter
1/2 cup (110 grams) Nutella

1. Cream butter and sugar in a mixer with paddle attachment until creamy.
2. Add egg and vanilla and mix until uniform.
3. Add the ground hazelnuts and mix.
4. Sift flour and cocoa powder together.
5.Mix into the wet mixture slowly until combined.
6.Wrap in plastic wrap  or baggie and refrigerate at least 1-2 hours ( maybe even in the freezer to harden it more- will also try that next time)
7. Preheat oven to 180 C ( 350 F). Roll out dough between two sheets of parchment paper (not too thin) and cut into circles using a round, fluted cookie cutter(doesn't have to be fluted, just plain round is fine- looks pretty though!) ( I happened to have a set with one solid and a matching one with a center hole)
8. Bake on cookie sheets lined with parchment paper or silicone mats for 8-10 minutes. Remove from oven, cool on baking sheet for five minutes then remove to further cool on a cooling rack.
9. For the filling: Melt chocolate over a bain marie.Turn off heat and add the butter and nutella. Stir to form a thick, shiny cream.
10. Spread a generous amount of cream on the flat side of one cookie with an offset spatula and top with another. (The original recipe says to put the cream in a pastry bag and pipe it on with a star tip. I didn't bother since there weren't enough cookies in my opinion to take the time to do that.) Press slightly to adhere . You can sift a small amount of cocoa powder on top if you like. I didn't.
Can be stored in a tightly closed box up to three days.The cookies can also be frozen without the cream for 2-3 months.

Tuesday, October 20, 2009

The Cake Slice- Cinnamon Pecan Coffee Cake


This is my first post with the "The Cake Slice" group. The group chose a Cinnamon Pecan Coffee cake from "Southern Cakes" by Nancie McDermott. I have yet to buy the book, but on my next visit to the U.S. in December, it is definitely on my list. I enjoyed making this cake because I felt it was easy to use substitutions. Since I didn't have all the exact ingredients, I decided to use what I had in the house, rather than go out and buy special stuff. The result was delicious- warm, room temperature or warmed up the next day in the microwave. A perfect choice to go with a nice hot cup of coffee, morning or afternoon- or for that matter, any time of day! Looking forward to next month's choice!
Here's the recipe and the little changes I made.

Cinnamon Pecan Coffee Cake
( Southern Cakes by Nancie McDermott)
Makes a 13 x 9 inch sheet cake ( I used two smaller pans as you can see in the picture)
For the Cake

3 cups all purpose flour
1 tbsp baking powder
1 tsp salt
1 tsp vanilla extract
1 cup milk
1 cup (2 sticks) butter, softened
1 cup sugar
2 eggs

For the Cinnamon Raisin Filling
1½ cups light brown sugar (I used dark brown since that was what was in the house- it was fine!)
3 tbsp all purpose flour
3 tbsp cinnamon
1½ cups raisins ( no raisin lovers in this house!)
1½ cups coarsely chopped pecans ( I had a mixture of  nuts left over from this and that - chopped them all together and it turned out super!)
¾ cup (1½ sticks) butter, melted

Method
Heat the oven to 350 degrees F. Grease and flour a 13 by 9 inch pan.
To make the filling, combine the light brown sugar, flour and cinnamon in a bowl and stir with a fork to mix everything well. Combine the raisins and pecans in another bowl and toss to mix them. Place the cinnamon mixture, nut mixture and melted butter by the baking pan to use later.

To make the cake batter, combine the flour, baking powder and salt in a bowl. Stir the vanilla into the milk. In a large bowl combine the butter and sugar and beat with a mixer on high speed until pale yellow and evenly mixed, about 2 minutes. Scrape down the bowl to ensure a good mix. Add the eggs and beat for another 2 minutes, scraping down the bowl now and then, until the mixture is smooth and light.
Use a large spoon or spatula to add about a third of the flour mixture to the butter mixture and stir only until the flour disappears. Add a third of the milk and mix in. Repeat twice more until all the flour and milk mixtures have been incorporated. Stir just enough to keep the batter smooth.
Spread half the batter evenly into the prepared pan. Sprinkle half the cinnamon mixture over the batter followed by half the melted butter. Scatter half the raisins and nuts over the top. Spread the remaining batter carefully over the filling, using a spatula to smooth the batter all the way to the edges of the pan. Top with the leftover cinnamon, butter and nut mixture, covering the cake evenly.
Bake for 45 to 50 minutes, until the cake is golden brown, fragrant and beginning to pull away from the edges of the pan. Place the pan on a wire rack and allow to cool in the pan for 5 to 10 minutes before serving in squares right from the pan. The cake is delicious hot, warm or at room temperature.


Sunday, October 18, 2009

Warm couscous salad with stir-fried veggies


My real passion is baking, but my family has to eat sometime too. I mean eat real food, not just sugar. Since my daughter has been having stomach problems as well as a variety of food allergies, I am always on the lookout for healthy dishes that are tasty, nutritious and easy to make. I'm willing to fuss and go complicated with baking, but cooking for me needs to be straight forward and fairly quick.
I found this recipe in an Israeli cookbook I recently purchased called "The Healthy Kitchen". I 've made a few things from the book and so far it has all been delicious.
This salad can be eaten warm or room temperature- if it has been in the fridge I recommend it be warmed up before eating. It's colorful, tasty and satisfying- you can play arond with the vegetables if you don't have exactly what it calls for in the recipe- that's what I did. Here is Israel you can buy packages of instant couscous. Just add boiling water and stick it on the stove or in the microwave, and you have super yummy couscous. I don't know if it is available in the U.S.,but I imagine it can be found in either the foreign foods section of a large supermarket or in a specialty grocery store.

Couscous Salad with Stir-fried Veggies  ( 6-8 servings)

1/4 cup olive oil
1 sweet potato, peeled and cut into small cubes
1 coarsely chopped onion
1 eggplant cut into small cubes
2 peppers cut into small cubes
( I added a can of garbazo beans too- it really added a nice texture to the dish)
1 package of regular or whole wheat couscous (350 grams)
1/3 cup of chopped parsley

Dressing
2 tablespoons olive oil
3 tablespoons freshly squeezed lemon juice
1 tablespoon balsamic vinegar
salt and pepper to taste

1. Prepare the vegetables:  Heat a large saute pan or wok on medium heat. Add oil and sweet potato- saute 5     minutes while stirring, unitl lightly browned. Add onion, eggplant, pepper and garbanzo beans and stir fry another 5-7 minutes , until soft.
2. For the dressing: Add the oil, lemon juice  and balsamic vinegar to the vegetables. Salt and pepper- mix. Cover and cook 2-3 minutes. Turn off the heat and leave covered.
3. Prepare the couscous according to package directions without any spices,salt or pepper. Be sure to flake the couscous with a fork to separate the kernels.
4. Add the veggie mix ( including all the juices) and parsley; mix, correct the seasoning.
 Alternative cooking option:
Instead of stir frying the veggies, roast them all together in the oven. Organize the vegetables on an oven tray lined with parchment paper. Sprinkle a bit of olive oil and seasonings over and roast for 20 minutes at 400 F.


Saturday, October 17, 2009

Just playing around

I hate to waste. When I bake, I scrape the bowl clean of any dough or batter so well it hardly needs cleaning!(Don't worry, I really do wash them!) The waste thing also goes for leftover components of a recipe. When I made that coconut cake last week , there was a lot of leftover filling and frosting. I knew that if I just refrigerated them , waiting for an opportunity to use the stuff, it would spoil. So I had to come up with something to make good use of both things. I love anything with a chocolate-coconut combination ( Bounty Bars!!) so I whipped up a batch of simple chocolate cupcakes. I put a spoonful of the batter in the muffin cup, then a scant teaspoon of the coconut filling , finally covering it with another large spoonful of batter. They baked up so beautifully! Frosted with the leftover frosting, they were a big hit with the lucky third grade class I taught the next day!!


Now, after all that, I STILL had filling leftover. Among my endless pile of recipes "to make", I found one for homemade peanut butter cups. OK- so why not just make them with coconut instead? Like a homemade Bounty bar! They are fast, easy ( no tempering) and didn't last two minutes on the table in
the teacher's room. Now the coconut filling is finally gone! Here's the  how to:

Chocolate-Coconut Cups
(adapted from Joyofbaking.com)

Line 36 mini muffins tins with paper liners (it may yield even more than that)

Chocolate part:
9 oz. (225 grams) semi sweet chcolate, coarsely chopped ( I used bitter chocolate)
9 oz.( 225 grams) milk chocolate, coarsely chopped
1 tablespoon ( 10 grams) butter ( the original recipe calls for shortening, but I can't get it here so I used butter and it worked just fine)


Melt the chcocolates and butter in a bowl over a pot of simmering water.
Drop a teaspoonful of chocolate into the muffin cups. Place a scant teaspoon of the coconut filling over it then top with another teaspoon of chocolate. Refrigerate until set. Store in a closed container in the fridge- if they last that long! Enjoy!

Thursday, October 15, 2009

Inspiration

Have you ever gone to see a movie by your lonesome? Yesterday was my first time and I actually loved it! I took myself to see "Julie and Julia"- I didn't want to bring any family members  for fear they would be bored out of their minds and give me dirty looks for dragging them along. Their loss!! It was so good! I enjoyed every minute of it and was just amazed ( as usual) at Meryl Streep. She is the best- no matter what role she plays. To say the least, the movie inspired me. I was not aware of Julia Child's life story and she really was a unique person. I can see how Julie became so connected to her.
Of course, I came home started cooking and baking immediately!! This is a coconut cake that I made for my daughter's birthday ( OMG, I have a 28 year old daughter!!). It is a combination and adaptation of numerous recipes I have found for coconut cake and it seems to be the best combination for us!


Coconut Layer Cake ( adapted and concocted from various sources)
Makes 1 3-layer 9-inch cake, but I made it with just two layers and it was fine

Cake:
1 cup ( 200 grams) unsalted butter, softened
2 cups ( 400 grams) sugar
4 large eggs, at room temp.
1 1/2 cups (210 grams) self-rising flour
1 1/4 cups (175 grams) regular flour
1/2 cup milk
1/2 cup coconut milk
1 tsp. vanilla

Filling:
3/4 cup milk ( I used a combination of milk and coconut milk- it adds great flavor)
1/2 cup (100 grams) sugar
5 oz.  ( 150 grams) sweetened, shredded coconut
1 tsp. vanilla extract

Frosting:
3 egg whites ( about 120 grams )
1 1/2 tsp. vanilla extract
1/2 cup cold water
1 1/2 cup ( 100 grams ) sugar
1/4 tsp. cream of tartar

Garnish: toasted, shredded coconut
For soaking the cake: few teaspoons of pina colada mix and rum mixed together
Preheat oven to 350F ( 180 C)  Grease and lightly flour 2 or 3 9 in. pans. Line bottoms with parchment paper rounds and lightly grease and flour.
Cake:
Cream butter until soft and smooth. Add sugar gradually and beat until fluffy. Add the eggs one at a time and beat well after each. Sift the flours together and alternately with the milk and vanilla, adding the flours last. Divide batter into cake pans and bake for 20- 25 minutes or until toothpick comes out clean. Cool  in pans for 10 -15 min. Remove from pans and cool on wire rack.
Filling:
Whisk the milk  and sugar in a medium saucepan until completely combined. Stir constantly about 5 minutes until thick and bubbly. Remove from heat and add the coconut and vanilla extract. Cover and cool.
When the cake is cooled, poke holes in the bottom layer with a toothpick or fork and gently pour 1/2 the rum-pina colade mix over the cake and let it soak in. I used a small ladle. Spread the filling ( or half of it if you are making a 3 layer cake) and then place the second layer on top and gently pour the rest of the rum mix to soak. The cake should be all ready to ice as soon as the frosting is ready.
Frosting:
Combine egg whites and vanilla inthe bowl of electric mixer and set aside. In a saucepan, combine water , sugar and cream of tartar. When the mix starts to bubble at the edges stir to be sure all the sugar is completely dissolved. Let it come to a rolling boil ( 2-3 minutes) and remove immediately from the heat.
Begin beating the egg whites and vanilla with whisk attachment until foamy. Slowly pour in the sugar syrup, in a steady, slow stream and continue beating on med- high until stiff peaks form but the frosting is still creamy. Frost top and sides of cake.
Toast shredded coconut in a dry pan or in the oven . Watch carefully because it happens really fast! Coat the cake with the toasted coconut.


Tuesday, October 6, 2009

Cookies for Rosh Hashana

A little late but with good thoughts and wishes for a New Year.
Here are some of the cookies I made for the Jewish New Year.


pomegranates


                                                                          apples


shofar


honey jars

Saturday, September 26, 2009

A Princess Birthday

I actually got my first real order for decorated cookies and a birthday cake! A little girl turning 6 wanted a princess birthday party. She had seen my cookies before and decided she wanted princess dresses for the girls and swords for the boys. She also wanted a  cake covered in pink ( what else!?) fondant. I haven't had too much experience with fondant, but it was something I thought I could do. Turned out to be no major problem, except for one. In all my enthusiasm and making sure it was finished on time and with perfection, I forgot to take a picture of it! Cute, huh? I'm trying to find out if they took a pic at the party before they cut it and if so, I will post it at another time. I was very pleased with the result of the cookies and so was the little girl. Funny thing happened at the party- her Dad told me that some of the boys wanted the dresses and some of the girls wanted swords! Good for them- no gender issue there! It all worked out in the end and everyone got what they wanted. Hope this is the first of many more orders to come- I really enjoyed  the process!


Friday, September 25, 2009

Committment


OK- this is it! I'm tired of being a procrastinator. I just joined the "The Cake Slice" group and I am committed to posting once a week ( remember those words!) and being diligent about taking pictures of things I bake. Actually, today I am writing about something I made a few weeks ago, and has nothing to do with baking. I like to cook but I do it because people need to eat around this house. If I could just serve sweets all the time, I'd be happy! One thing I have found I do like is pickling veggies. The taste of homemade is so much better than the store-bought stuff and without all the preservatives and unpronounceable ingredients.

Someone brought me a kilo of freshly picked radishes from a farm in the Southern part of Israel and I knew that we were not going to eat a kilo's worth of them- no matter how delicious and fresh they were! So, start my never-ending interent search for something to do with radishes- something easy that is! The idea of pickling them seemed interesting and appetizing. After viewing a number of recipes I came up with a concoction of my own, taken from a variety of sources. It's quick, easy to do and how yummy! Great to add to a sandwich, salad or just munch away for a snack!

Pickled Radishes

1-2 lbs. red radishes
2 small garlic cloves
1/2 raw red beet ( can be cooked if you happen to have it around like I did) optional
4 TB. dark brown sugar
4 tsp. kosher salt ( pickling salt or sea salt is fine too)
1 cup white vinegar ( I happened to have apple vinegar hanging around and that was fine too)
1-2 cups water

Wash the radishes, trimthe ends and cut in medium size slices. Peel garlic and cut in  half. Pack the radishes and garlic into a  canning jar with the red beet if using- it really enhances the look with a bright pink color.
Put the remaining ingredients into a small pot and boil. Pur the hot mix over the radishes and close the jar. Let cool , then refrigerate for 4 hours or longer before serving. Keeps for weeks in the fridge , if they last that long!


Sunday, August 23, 2009

Not so Easy

I haven't posted for a month now and not because I've been away or anything. I've been working on starting up a small home-based baking business, but I must say, it's not as easy as it may seem- in theory at least. I spent most of the summer baking and trying out recipes to see what  works well, tastes good and is marketable. I decided to start on a very (very) small basis and, other than pass out the business cards I had made, I have done no formal advertising. With school back in session ( I teach Hebrew at the elementary school level) I thought that bringing some of my products to school would be a good boost. It would also let me know if I could manage working full time and bake on a larger scale at the same time. Like the title of this post says -"not so easy"! Sitting in the teacher's room trying to sell my stuff was too demeaning- just not my style. So for now, I will just be taking orders from those who know my work and like the results. This is a learning and soul-searching experience for me - baking is my passion and it is the thing  I enjoy doing the most- I feel the best when I am doing it- so where does it fit in my life?  Do I concentrate on the decorated cookies and cakes, or branch out into regular baked goods as well ( which is what I've been doing for the past few weeks)? Do I just let it remain as a passion and not try to earn money with it? I don't know at the moment, but I am on the journey to find out.
And.. in the meantime, I can' t post without telling you about at least one of the things I made recently. Unfortunately , I don't have a picture of it  since I was so busy baking, I neglected to take photos of all my work- bright huh?!
This is a recipe for what we call in my family, "pecan cups". It is a recipe from a dear family friend, that has become a real tradition in our house. The recipe is written on a tattered index card, taped into an old recipe notebook of mine.  For some reason, those are the recipes that seem to taste the best! I covered it with plastic wrap to preserve it since I can't bear to throw it away and rewrite it on a clean, new card. 
I'm sure there are many versions of it around- this is mine. Enjoy!

Pecan Cups

1 stick butter ( 100 g.)
1 3 oz. package cream cheese ( 75 g.)
1 cup flour (140 g.)

Blend together in food processor and chill for 30-60 min.
In the meantime, make the filling. Preheat oven to 325 F ( 170 C.)
3/4 cup brown sugar (200 g.)
1 heaping tsp. butter, softened
1 egg
1 tsp. vanilla

Mix the filling ingredients together until smooth.
Form small  ( approx. 1 in.) balls of dough and place in a mini- muffin pan. Using your fingers, press dough on bottom and sides of each cup.
Break up some pecans and place a few on the bottom of each dough cup, fill each with a scant teaspoon ( it puffs up ) of filling and then top with more pecans.
Bake for 20-25 mins. unitl lightly browned.
Cool on rack for 10 minutes then remove from pan. I serve them in mini cupcake papers.

Wednesday, July 22, 2009

All Done!

Our group
That's it! I finished the pastry chef course ( I even passed the test I was dreading!) and what an ending it was. We spent the last two lessons preparing for the "finale" - an evening with our invited guests tasting our goods.
The evening was a true success - food, atmosphere and a major cooperative work effort on the part of all the class participants. We worked sooooo hard- I am now convinced that working in a pastry shop, being on your feet for amazingly long hours, is not for me. When I finally got home after midnight, I could barely walk and I was out of commission for most of the following day! I'll stick with the small time home-based business for now.
The evening began with roaming waiters ( us!) serving small cups of cold basil zucchini soup with cheese sticks. It was a very hot night and the event was outdoors so the cold soup was a welcome. A buffet table was then manned by more waiters (us again!) serving salads, a variety of breads, quiches and savory bites ( all prepared by us , of course!)

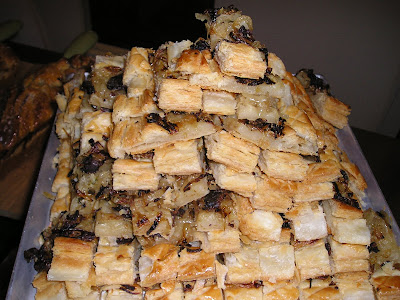
pissaladiere (puff pastry with carmelized onions, anchovies and black olives

Then came the "piece de resistance"- dessert. What a selection there was. Chocolate-nougat mousse, toffee- nut tarts, chocolate-pear tarts, dulche de leche mousse, cheesecake mousse with a cinnamon crumble ( yum!) coffee-pecan cookies, basil-almond lemon cookies ( very interesting), vanilla creme cookies, vanilla-chocolate- coffee cookies, citrus cake, chocolate-poppy seed cake, white chocolate penacotta with passion fruit and a streusel topping, meringue cups with a lemon-mint ganache filling...... should I go on?!

mini chocolate fondant cake and in the background,toffee-nut tart


Krantz Cakes- (plaited yeast cakes with a chocolate/halva filling)
I managed to get a only few pictures in between the serving and preparing and washing up. Feast your eyes!


basil-almond lemon cookies
All in all, it was a wonderful learning experience and I made some great friends along the way! Onward to the advanced course!